DMSの制限にヒットする
Azure Database for PostgreSQL Single ServerからFlexible Serverへの移行に際して、Azure Database Migration Serviceを使うというのが推奨されていてDMSでは移行中もデータの整合性は保てるものの、データベースのサイズが1TBを超えるとDMSは使えず、手動でpg_dump / pg_restoreしないとならない。データサイズが大きくなるとこれはなかなか骨が折れるし、ましてや本番サーバだと移行元にデータがINSERT / UPDATEされる状況であろうから、停止するにしてもpg_dump / pg_restoreする時間は限られる。
並列COPYすることで時間は短縮出来るけれど、もうちょっと賢い方法は無いかと思っていたところ、ナイスなツールが出てきたので検証してみようと思う。
pgcopydbとは?
pgcopydbはpg_dump / pg_restoreの--format=directoryオプションに着想を得て、可能な限りデータの移行時間を短縮するツール。上記リンクで自分が書いたPythonを100倍洗練したようなツール(pgcopydbはC言語で書かれている)で、まあ書いたのが旧Citus Data・現Microsoftに在籍するPostgreSQLの著名なコントリビューターでもあるDimitri Fontaine氏であるから、素直に使わせて貰うだけだったりするw
ここでは詳しく書かないが、pgcopydbのデザインや動作の詳細などはGitHubを参照のこと。
テストの準備
まず、移行元となるAzure Database for PostgreSQL Single Serverと、移行先となるFlexible Server、それにテスト用のデータを投入し、その後pgcopydbを実行するUbuntuのVMを1台用意しよう。もし本番なら既にデータは入っているだろうからデータを投入する必要はないはずで、そうであるならpgcopydbを実行するためだけにVMを用意する必要は無い。READMEにある通り、Docker Hubからpullして実行可能だ。
$ docker run --rm -it dimitri/pgcopydb:v0.8 pgcopydb --versionDocker環境を用意するのが面倒だと思うなら、Azure Container Instanceで実行すれば良いだけのことだ。
% az container create -g riopgmigrationtesting --name pgcopydb --image dimitri/pgcopydb:v0.8 --cpu 1 --memory 1

% az container list -g riopgmigrationtesting -o table
Name      ResourceGroup          Status     Image                  CPU/Memory       OsType    Location
--------  ---------------------  ---------  ---------------------  ---------------  --------  ----------
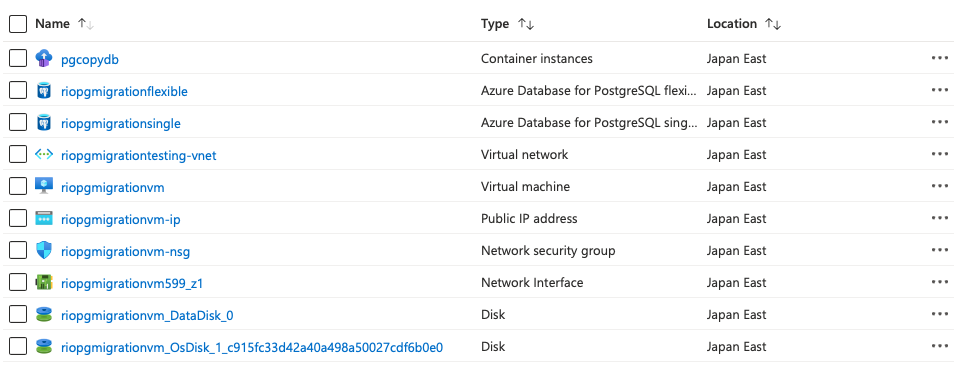
pgcopydb  riopgmigrationtesting  Succeeded  dimitri/pgcopydb:v0.8  1.0 core/1.0 gb  Linux     japaneast
リソースのデプロイが終わるとこんな感じだろう。

テストデータを用意する
ここではHyperscale (Citus)のハンズオンで使われるデータを使い回させてもらう。Ubuntu VMにpostgresql-clientパッケージをインストールしてSingle Serverに接続出来るようにしておき、psqlを立ち上げたらまずテーブルを作成する。
CREATE TABLE github_events(
    event_id bigint,
    event_type text,
    event_public boolean,
    repo_id bigint,
    payload jsonb,
    repo jsonb,
    user_id bigint,
    org jsonb,
    created_at timestamp
);
CREATE INDEX event_type_index ON github_events (event_type);
psqlを終了して、テストデータをダウンロードする。
# curl -O https://examples.citusdata.com/events.csvテストデータは300MBぐらいなので100回ぐらいCOPYして水増しする。まさにここを並列実行させると高速化できるので、GNU Parallelでもxargs -Pでも使ってトライしてみて欲しい。
# for i in `seq 100`; do psql "host=riopgmigrationsingle.postgres.database.azure.com port=5432 dbname=postgres user=rifujita@riopgmigrationsingle password=password sslmode=require" -c "\copy github_events from 'events.csv' WITH CSV"; done
COPY 126245
COPY 126245
COPY 126245
......
COPY 126245
COPY 126245
COPY 126245
pgcopydbをビルドする
執筆時点ではdebian用のpgcopydbパッケージが依存するライブラリが新しいため、Ubuntu 20/18でインストール出来なかったのでビルドする。
$ sudo apt-get install -y --no-install-recommends \
    build-essential \
    libicu-dev \
    libkrb5-dev \
    libssl-dev \
    libedit-dev \
    libreadline-dev \
    libpam-dev \
    zlib1g-dev \
    liblz4-dev \
    libxml2-dev \
    libxslt1-dev \
    libselinux1-dev \
    libncurses-dev \
    libncurses6 \
    make \
    openssl \
    sudo \
    tmux \
    watch \
    lsof \
    psutils \
    valgrind \
    postgresql-common \
    libpq5 \
    libpq-dev \
    postgresql-server-dev-all \
    postgresql-common \
    postgresql-client-common
$ git clone https://github.com/dimitri/pgcopydb
$ cd pgcopydb
$ sudo make clean install
これで/usr/lib/postgresql/12/bin/pgcopydbにバイナリが置かれるはずだ。
追記(2022.08.25): Ubuntu 22ではパッケージでインストール可能。/usr/bin/pgcopydbにインストールされる。
実行する
実行する前に環境変数を設定する。ただし、ちょっと問題がある。
pgcopydbのドキュメントには以下の形式でURIが指定されているのだけれど、Azure Database for PostgreSQL Single Serverではユーザー名の形式が"user@hostname"なので、この形式ではエラーになってしまう。
$ export PGCOPYDB_SOURCE_PGURI="postgres://user@source.host.dev/dbname"ので、key=value形式で指定する。移行先のFlexible Serverはドキュメントに記された形式で問題ないが、ここではkey=value形式に揃えてある。
$ export PGCOPYDB_SOURCE_PGURI="port=5432 host=riopgmigrationsingle.postgres.database.azure.com dbname=postgres user=rifujita@riopgmigrationsingle password=password"

$ export PGCOPYDB_TARGET_PGURI="port=5432 host=riopgmigrationflexible.postgres.database.azure.com dbname=postgres user=rifujita password=password"
さて実行しよう。
$ /usr/lib/postgresql/12/bin/pgcopydb clone --table-jobs 8 --index-jobs 2実行中、以下のようにログが出力される。
11:00:02 2734 INFO  Running pgcopydb version  from "/usr/lib/postgresql/12/bin/pgcopydb"
11:00:02 2734 INFO  [SOURCE] Copying database from "postgres://rifujita%40riopgmigrationsingle@riopgmigrationsingle.postgres.database.azure.com:5432/postgres?password=****"
11:00:02 2734 INFO  [TARGET] Copying database into "postgres://rifujita@riopgmigrationflexible.postgres.database.azure.com:5432/postgres?password=****"
11:00:02 2734 INFO  Using work dir "/tmp/pgcopydb"
11:00:02 2734 INFO  Exported snapshot "00000005-00000AAF-1" from the source database
11:00:02 2750 INFO  STEP 1: dump the source database schema (pre/post data)
11:00:02 2750 INFO   /usr/bin/pg_dump -Fc --snapshot 00000005-00000AAF-1 --section pre-data --file /tmp/pgcopydb/schema/pre.dump 'postgres://rifujita%40riopgmigrationsingle@riopgmigrationsingle.postgres.database.azure.com:5432/postgres?'
11:00:02 2750 INFO   /usr/bin/pg_dump -Fc --snapshot 00000005-00000AAF-1 --section post-data --file /tmp/pgcopydb/schema/post.dump 'postgres://rifujita%40riopgmigrationsingle@riopgmigrationsingle.postgres.database.azure.com:5432/postgres?'
11:00:03 2750 INFO  STEP 2: restore the pre-data section to the target database
11:00:03 2750 INFO  Listing ordinary tables in source database
11:00:03 2750 INFO  Fetched information for 1 tables, with an estimated total of 14 million tuples and 16 GB
11:00:03 2750 INFO  Fetching information for 0 sequences
11:00:03 2750 INFO   /usr/bin/pg_restore --dbname 'postgres://rifujita@riopgmigrationflexible.postgres.database.azure.com:5432/postgres?' --single-transaction --use-list /tmp/pgcopydb/schema/pre.list /tmp/pgcopydb/schema/pre.dump
11:00:03 2750 INFO  STEP 3: copy data from source to target in sub-processes
11:00:03 2750 INFO  STEP 4: create indexes and constraints in parallel
11:00:03 2750 INFO  STEP 5: vacuum analyze each table
11:00:03 2750 INFO  Now starting 1 processes
11:00:03 2750 INFO  Reset sequences values on the target database
11:00:04 2759 INFO  COPY "public"."github_events";
11:00:04 2758 INFO  Copying large objects
11:13:24 2759 INFO  Creating 2 indexes for table "public"."github_events"
11:13:24 3926 INFO  VACUUM ANALYZE "public"."github_events";
11:13:24 3927 INFO  CREATE INDEX payload_index ON public.github_events USING gin (payload jsonb_path_ops);
11:13:24 3928 INFO  CREATE INDEX event_type_index ON public.github_events USING btree (event_type);
11:23:03 3925 INFO  Found 2/2 indexes on target database for table "public"."github_events"
11:28:52 2750 INFO  STEP 7: restore the post-data section to the target database
11:28:52 2750 INFO   /usr/bin/pg_restore --dbname 'postgres://rifujita@riopgmigrationflexible.postgres.database.azure.com:5432/postgres?' --single-transaction --use-list /tmp/pgcopydb/schema/post.list /tmp/pgcopydb/schema/post.dump

  OID | Schema |          Name | copy duration | indexes | create index duration
------+--------+---------------+---------------+---------+----------------------
16498 | public | github_events |        13m20s |       4 |                 9m49s


                                          Step   Connection    Duration   Concurrency
 ---------------------------------------------   ----------  ----------  ------------
                                   Dump Schema       source       1s261             1
                                Prepare Schema       target       161ms             1
 COPY, INDEX, CONSTRAINTS, VACUUM (wall clock)         both      28m48s         1 + 2
                             COPY (cumulative)         both      13m20s             1
                    Large Objects (cumulative)         both       281ms             1
        CREATE INDEX, CONSTRAINTS (cumulative)       target       9m49s             2
                               Finalize Schema       target       141ms             1
 ---------------------------------------------   ----------  ----------  ------------
                     Total Wall Clock Duration         both      28m50s         1 + 2
 ---------------------------------------------   ----------  ----------  ------------
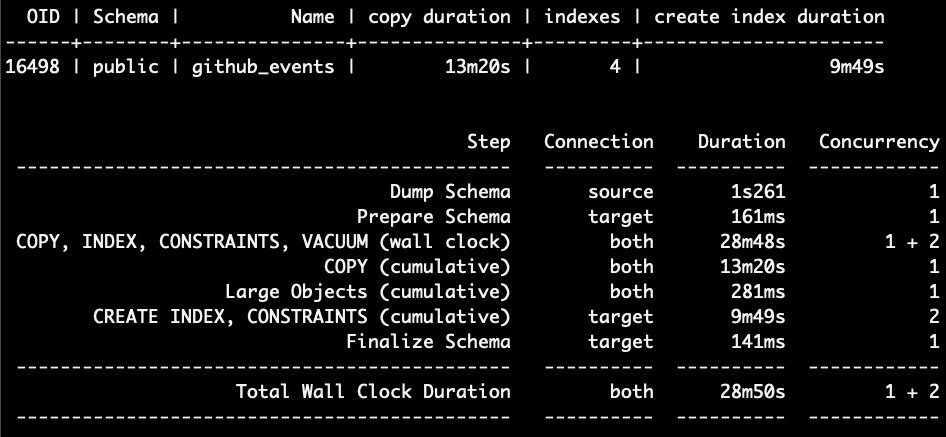
28分50秒で移行が完了した。元データは30GBほどだが、格納されていたサイズは約1,400万件で16GBほど。
Single Serverの制約に引っかかる?
pgcopydbのhelpを見てみよう。
$ /usr/lib/postgresql/12/bin/pgcopydb help
  pgcopydb
    clone     Clone an entire database from source to target
    fork      Clone an entire database from source to target
    follow    Replay changes from the source database to the target database
    copy-db   Copy an entire database from source to target
    snapshot  Create and exports a snapshot on the source database
  + copy      Implement the data section of the database copy
  + dump      Dump database objects from a Postgres instance
  + restore   Restore database objects into a Postgres instance
  + list      List database objects from a Postgres instance
+ stream Stream changes from the source database上で実行したサブコマンドはcloneだけれど、移行時に移行元のデータベースを停止できないといったことは多いはずだ。そう、followサブコマンドを使うとオンラインでの移行ができそう、に見えるのだけれど…。
followサブコマンドは論理デコーディングにwal2jsonエクステンションが移行元にインストールされていることが前提なので、wal2jsonがインストールされていないAzure Database for PostgreSQL Single Serverでは利用できない。くぅ、残念…。
追記(2022.08.25 10:56): 確認中。wal2jsonはSingle Serverにインストールされている。followが使えるかも。
なお、clone / fork / copy-dbの説明が同じなのは歴史的経緯というやつで、エイリアス、つまり動作は同じだけれど残してあるだけ。
まとめ
手動でpg_dump / pg_restoreするのと比べるとかなり楽なのでfollowサブコマンドが使えないにしても充分にメリットはある。もちろん、IaaSやオンプレで1TBを超えるデータを保持しているPostgreSQLが移行元であれば、wal2jsonを追加でインストールすればfollowサブコマンドを使ってオンライン移行が可能になると。


